
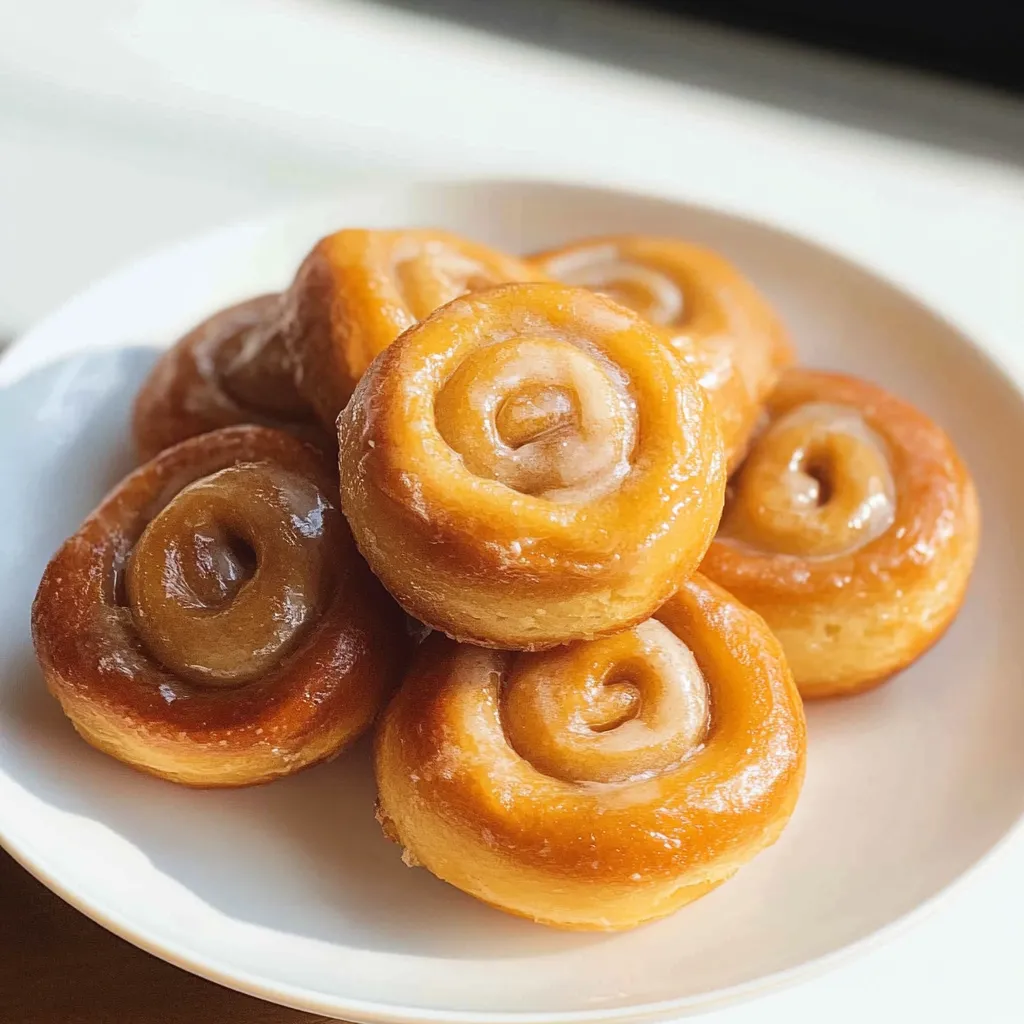
Why These Honey Buns Are the Ultimate Comfort Treat
There’s something special about a warm, sticky honey bun — that soft, pillowy dough, the gentle swirl of cinnamon, and the shiny, buttery glaze that clings to every edge. Whether you bake them or fry them, these homemade Honey Buns capture the nostalgic flavor of the classic store-bought kind — but fresher, softer, and so much more satisfying.
What I love about this recipe is how versatile it is. You can make them in the oven for a golden, fluffy version or fry them for that old-fashioned, melt-in-your-mouth texture. Either way, the aroma of butter, yeast, and cinnamon filling your kitchen is absolutely irresistible.
Ingredients You’ll Need for Homemade Honey Buns
These honey buns use simple pantry ingredients, but the key is balance — just enough sweetness to highlight the glaze without overpowering the soft, buttery dough.
Ingredients:
- 2 cups all-purpose flour
- 3 tablespoons granulated sugar
- ½ teaspoon salt
- ½ cup + 3 tablespoons milk
- 2¼ teaspoons instant or active dry yeast
- 5⅓ tablespoons melted butter
- 1 large egg
- ½ tablespoon ground cinnamon
- 1½ teaspoons vegetable oil (for greasing)
- 3 cups vegetable oil (for frying, optional)
For the Glaze:
- 6 tablespoons melted butter
- 2 cups powdered sugar
- 3–5 tablespoons milk
- 1 teaspoon vanilla extract
These ingredients come together to create dough that’s rich but light, with a hint of cinnamon warmth. The glaze adds the signature glossy finish that gives each bun its irresistible sweetness.
Preparing the Dough – The Foundation of Fluffy Honey Buns
Start by combining the dry ingredients — flour, sugar, and salt — in a stand mixer fitted with a dough hook. This ensures the base is evenly mixed.
Warm your milk until it’s about 105–110°F — just warm to the touch, not hot. This temperature wakes up the yeast without killing it. Add the yeast, melted butter, and egg to the milk and whisk to combine. You’ll notice a creamy, fragrant mixture that smells faintly of butter and yeast — a sign everything is activating perfectly.
Pour the wet mixture into the dry ingredients and knead on medium speed for about 10 minutes. The dough will be slightly sticky but smooth and elastic. That’s exactly what you want — too dry, and your buns will be dense.
Letting the Dough Rise – Patience Makes Perfect
Lightly grease your hands and a large bowl with vegetable oil. Shape the dough into a ball and place it in the bowl, turning it once to coat it evenly with oil. Cover it tightly with plastic wrap and let it rise in a warm place until it doubles in size.
This can take about an hour depending on your kitchen’s temperature. You’ll know it’s ready when the dough feels airy and puffs up beautifully when pressed. The yeast does all the work here, developing flavor and creating that soft, tender crumb we want.
Rolling and Shaping the Honey Buns
Once the dough has risen, press it down gently to release excess air and turn it out onto a lightly floured surface. Roll or press it into a rectangle about 6 by 14 inches.
Sprinkle the cinnamon evenly across the surface and lightly rub it in with your hands. That direct contact helps it stick better to the dough and gives you that even swirl later on.
Starting from the long side, roll the dough tightly into a log. Moisten the edge with a little water and pinch it closed to seal. This prevents it from unraveling during baking or frying.
Use unflavored dental floss or a sharp knife to cut the roll into slices about ½ to 1 inch thick. Floss gives you cleaner cuts and helps preserve the spiral shape.
Second Rise – The Secret to Light, Airy Buns
Place the slices cut side up on a parchment-lined baking sheet. If you’re baking them, space each bun about 2 inches apart. If you’re frying, place them closer — about ½ inch apart — since they’ll puff up and then separate easily after frying.
Lightly spray the tops with nonstick spray, cover them with plastic wrap, and let them rise for another 30 minutes. This second proofing gives the dough that soft, cloud-like texture that’s so satisfying to bite into.
Baking Method – Golden and Tender Honey Buns
Preheat your oven to 350°F (175°C). Once your buns have risen, bake them for 15–18 minutes until the edges turn a gentle golden brown.
While they bake, whisk together the glaze ingredients — melted butter, powdered sugar, milk, and vanilla extract — until smooth and glossy. The aroma of warm butter and vanilla is simply divine.
After baking, let the buns cool for 10–20 minutes, then dip the tops into the glaze. Allow the excess to drip off before placing them on wax paper to set. As the glaze firms up, it creates that shiny, slightly sticky coating that gives honey buns their signature look.
Frying Method – For That Classic Honey Bun Flavor
If you prefer the fried version, heat about 3 cups of oil in a deep saucepan to 320°F. This lower temperature ensures the buns cook through without burning the outside.
Carefully add one or two buns at a time, frying until golden on one side before flipping. Each side takes about 1–2 minutes. Remove them with a slotted spoon and drain on a paper towel-lined plate.
Dip the warm buns directly into the glaze while they’re still slightly hot — this helps the glaze soak in a bit for that ultra-soft, bakery-style texture. Let them rest on wax paper to set.
The fried version tastes like a cross between a doughnut and a pastry — crisp at the edges, soft inside, and perfectly sweet.
Perfecting the Glaze – Smooth, Shiny, and Sweet
The glaze is what truly makes these buns shine — literally. Combine melted butter, powdered sugar, milk, and vanilla extract in a bowl and whisk until completely smooth. You can adjust the consistency easily — add more milk for a thinner glaze or more sugar for a thicker one.
For extra flavor, you can mix in a teaspoon of honey or maple syrup. The glaze should pour easily and cling just enough to coat the buns evenly.
Storing and Reheating Honey Buns
Homemade honey buns are best enjoyed fresh, but they store well, too. Keep them in an airtight container at room temperature for up to 2 days or refrigerate for up to 5 days.
To reheat, pop them in the microwave for 10–15 seconds or warm them in a low oven until soft again. The glaze may melt slightly, but that’s part of their charm — warm, sticky, and irresistible.
Flavor Twists and Variations
Once you’ve mastered the base recipe, you can play around with it. Try adding a drizzle of honey in the glaze for a deeper sweetness, or mix in finely chopped nuts for texture.
For a cozy fall version, sprinkle a bit of nutmeg or cardamom with the cinnamon. Or make a chocolate glaze using cocoa powder and milk for a fun twist.
These buns also make a lovely breakfast or brunch treat — pair them with a cup of coffee, or serve them warm with a little butter for that melt-in-your-mouth goodness.
Honey Bun FAQ – Your Top Questions Answered
Can I make the dough ahead of time?
Yes! You can refrigerate the dough after the first rise. Just bring it back to room temperature before rolling and shaping.
Why are my honey buns dense?
They may not have risen long enough. Make sure your yeast is active and your dough doubles in size during the first proof.
Can I air fry these instead of deep frying?
Absolutely! Brush the buns lightly with oil and air fry at 320°F (160°C) for about 6–8 minutes until golden.
How do I get my glaze shiny and smooth?
Use warm melted butter and whisk well to remove any lumps. Applying the glaze while the buns are slightly warm also gives a beautiful glossy finish.
What’s the best way to enjoy them?
Honestly — fresh out of the oven, still warm, and just glazed. The texture and aroma are unbeatable.
Soft, sticky, and glazed to perfection, these homemade Honey Buns are the kind of treat that turns an ordinary day into something special. Whether baked or fried, they deliver that nostalgic sweetness you can’t help but crave — a comforting classic that tastes like pure warmth and joy.
