
A Sweet Taste of Nostalgia – The Story Behind Stuffed Chocolate Chip Cookie Bars
Chocolate chip cookies have always been a symbol of home baking for me. They’re the first thing many of us learn to bake, and the smell alone can instantly make a kitchen feel warm and welcoming. Turning them into thick, stuffed bars feels like giving that classic cookie a comforting upgrade. Instead of shaping individual cookies, you build layers of dough and hide a creamy chocolate center inside, which makes every slice feel like a surprise.
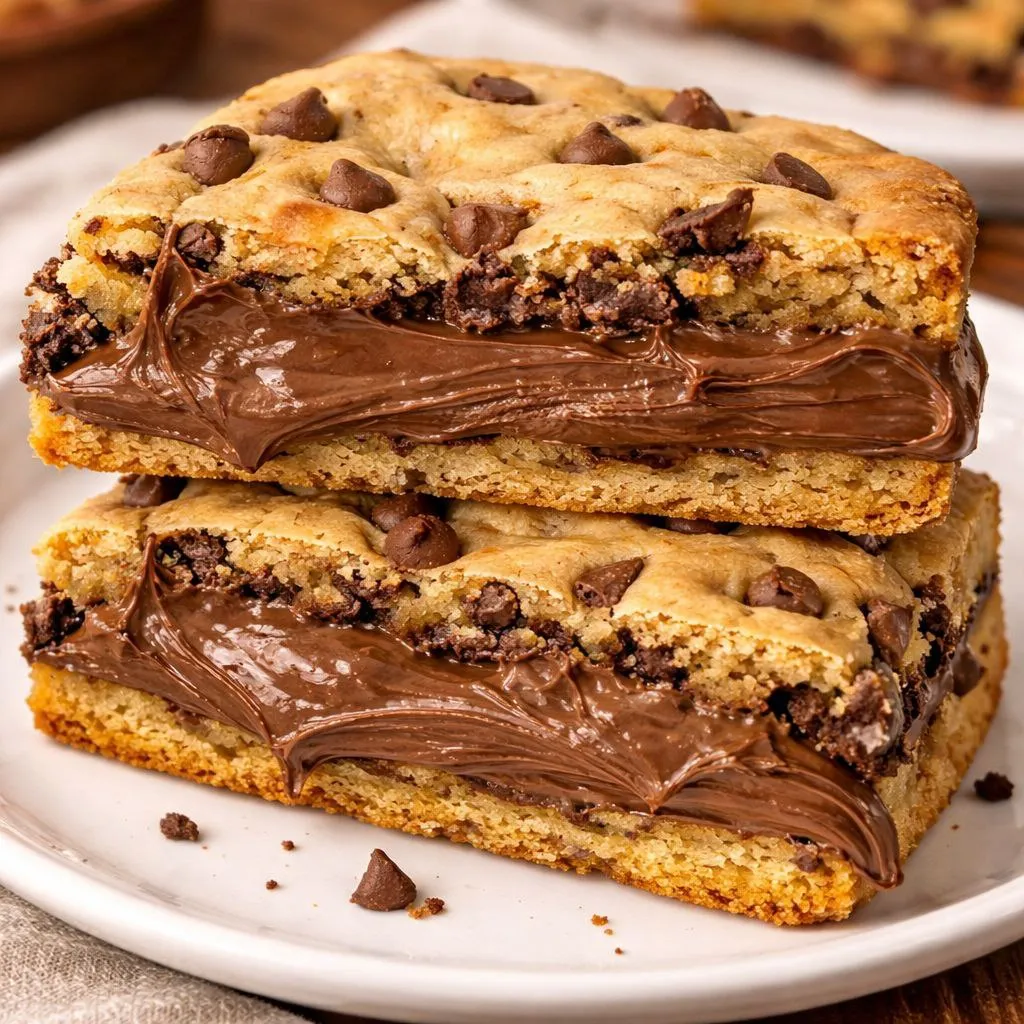
The first time I made these, I remember cutting into them too early and watching the Nutella slowly ooze out. It wasn’t perfect, but it was absolutely delicious. That’s part of the charm of this recipe—it doesn’t need to look bakery-perfect to taste incredible. The edges bake up golden and slightly crisp, while the middle stays soft and rich with melted chocolate. These bars are the kind of dessert you make for family nights, bake sales, or whenever you want something indulgent without too much fuss.
What You’ll Need to Make These Gooey Cookie Bars
This recipe relies on everyday pantry ingredients, which is one of the reasons I come back to it so often. There’s no need for special tools or complicated steps, just good-quality basics and a chocolate spread you truly love.
Ingredients:
- 125 g (1/2 cup) softened butter
- 1/2 cup white sugar
- 1/2 cup brown sugar
- 1 egg
- 1 tsp vanilla extract
- 1 3/4 cups all-purpose flour
- 1/2 tsp baking soda
- Pinch of salt
- 1 cup chocolate chips
- Nutella or chocolate spread (for filling)
Using both white and brown sugar gives the bars a balance of sweetness and moisture. The brown sugar adds depth and chewiness, while the white sugar helps with structure and light crisp edges.
Preparing Your Pan and Dough for Perfect Layers
Preheat your oven to 180°C / 350°F and line your baking pan with parchment paper. Make sure the paper hangs slightly over the sides so you can lift the bars out easily later. This step saves you from having to dig them out of the pan and risk breaking them apart.
Choose a medium-sized pan rather than a very large one. A smaller pan makes thicker, more satisfying bars with a visible chocolate layer inside.
Your butter should be softened, not melted. If it’s too warm, the dough can become greasy and spread too much in the oven. I usually take my butter out of the fridge about 30 minutes before baking. It should feel soft when pressed but still hold its shape.
Crafting the Dough – The Secret to Soft and Chewy Bars
In a large bowl, cream together the softened butter, white sugar, and brown sugar until smooth and fluffy. This step is important because it incorporates air into the dough and helps create a tender texture. You’ll notice the mixture becoming lighter in color and more creamy as you mix.
Add the egg and vanilla extract and stir until fully combined. The batter will look glossy and smell sweet and warm from the vanilla.
Next, add the flour, baking soda, and salt. Mix gently just until the dough comes together. Overmixing at this stage can develop too much gluten and make the bars dense instead of soft.
Fold in the chocolate chips with a spatula or wooden spoon. Try to distribute them evenly so every slice has little pockets of melted chocolate.
Layer, Fill, and Bake – How to Build the Ultimate Cookie Bar
Press half of the dough evenly into the bottom of your prepared pan. Take your time here and make sure the base layer reaches all corners. A flat, even layer helps the filling spread properly.
Spread a thick layer of Nutella or chocolate spread on top of the dough. I like to warm it slightly so it spreads more easily, but it should still be thick enough to hold its place. Leave a small border around the edges to prevent the filling from leaking out while baking.
Cover the chocolate layer with the remaining dough. Drop small pieces over the top and gently press them together to form a smooth surface. Try not to press too hard—you want distinct layers, not a single compact mass.
Bake for 20 to 25 minutes, until the top is lightly golden and the center still looks soft. The kitchen will fill with the smell of butter, sugar, and chocolate, and it’s hard not to peek through the oven door.
Tips for Even Baking and a Perfect Gooey Center
- Always use room-temperature ingredients so the dough mixes evenly.
- Do not overbake. If the bars look slightly underdone in the center, that’s ideal—they will firm up as they cool.
- Rotate the pan halfway through baking if your oven has hot spots.
- If the top browns too quickly, loosely cover it with foil for the last few minutes.
These small details help you achieve that perfect contrast between crisp edges and a soft, gooey middle.
Cooling and Cutting – Achieving That Signature Soft Texture
Once baked, let the bars cool in the pan for at least 15 to 20 minutes. The filling will be extremely hot at first, and cutting too soon will cause it to run everywhere.
When slightly cooled, lift the bars out using the parchment paper and place them on a cutting board. Use a sharp knife and wipe it clean between cuts for neat slices. You’ll see the chocolate layer in the center, and the texture should look soft and tender.
Serving and Storing Your Homemade Cookie Bars
These cookie bars are best enjoyed slightly warm, when the chocolate filling is still creamy. They taste wonderful with a glass of cold milk, a cup of coffee, or even a scoop of vanilla ice cream on top.
Store leftovers in an airtight container at room temperature for up to three days. For longer storage, keep them in the refrigerator for up to a week. Before serving, warm them briefly in the microwave to bring back that soft, gooey texture.
Creative Ways to Enjoy Stuffed Cookie Bars
You can turn these bars into a plated dessert by serving them with ice cream and a drizzle of chocolate or caramel sauce. They’re also great for lunchboxes, picnics, and parties because they hold their shape and stay soft.
Wrapped in parchment paper and tied with string, they make thoughtful homemade gifts that feel personal and comforting.
Variations to Try – From Peanut Butter to Caramel Centers
Instead of Nutella, try peanut butter, almond butter, Biscoff spread, or salted caramel. Each one gives the bars a different personality.
You can also add chopped nuts, shredded coconut, or mini marshmallows to the dough for extra texture. For a festive twist, sprinkle a few chocolate chips or crushed cookies on top before baking, or add a pinch of cinnamon to the dough for warmth.
Nutrition Snapshot – Sweet Facts About This Treat
These cookie bars are a rich dessert meant to be enjoyed in moderation. They provide energy from carbohydrates and fats, and the egg adds a small amount of protein. Because they’re homemade, you can control portion size and ingredients, which makes them more satisfying than packaged sweets.
Sweet Questions Answered – Your Cookie Bar FAQ Corner
Can I use margarine instead of butter?
Yes, but butter gives better flavor and structure. Margarine can make the bars softer and slightly greasy.
Why did my filling leak out?
This usually happens when the chocolate spread reaches the edges. Always leave a small border around the filling.
Can I freeze these cookie bars?
Yes. Wrap individual pieces tightly and freeze for up to two months. Thaw at room temperature or warm slightly before serving.
How do I know when they’re done baking?
The top should be lightly golden and the center just set. A slight jiggle in the middle is a good sign of a gooey interior.
Can I prepare these ahead of time?
Definitely. Bake them a day in advance and store in an airtight container. The flavor actually improves after resting overnight.
Stuffed Chocolate Chip Cookie Bars are one of those recipes that feel both simple and special. They’re comforting, rich, and always a crowd-pleaser. Once you try them, you’ll probably keep this recipe in your regular baking rotation for whenever you want something warm, chocolatey, and deeply satisfying.
