
Why These Cherry Cream Cheese Danishes Are So Irresistible
There’s something special about pulling a tray of golden, flaky pastries from the oven — the buttery aroma filling the kitchen, the sweet hint of cherries mingling with warm dough. These Cherry Cream Cheese Danishes are one of those bakery-style treats that look impressive but are surprisingly easy to make at home.
I love how this recipe combines the creamy richness of sweetened cream cheese with the bright tartness of cherry pie filling, all nestled in layers of puff pastry that bake up beautifully crisp. Every bite has that perfect balance of tangy fruit, velvety filling, and buttery crunch. Whether it’s for a cozy weekend breakfast, a brunch spread, or even dessert, these pastries never fail to impress.
Ingredients You’ll Need for That Perfect Balance of Flaky and Creamy
Here’s everything you’ll need to create these irresistible Cherry Cream Cheese Danishes — nothing fancy, just classic, dependable ingredients that come together beautifully.
Ingredients:
- 2 sheets frozen puff pastry, thawed according to package directions
- 8 ounces cream cheese, softened
- 2 tablespoons granulated sugar
- 1 teaspoon almond extract
- 1 can (21 ounces) cherry pie filling
Egg Wash:
- 1 large egg, room temperature
- 1 tablespoon water
Topping:
- Confectioners’ sugar, for dusting
The almond extract adds a subtle, nutty aroma that pairs wonderfully with cherries, while the puff pastry creates that signature golden, flaky texture. If you can, use all-butter puff pastry — the flavor is worth it.
Preparing the Puff Pastry – Getting That Perfect Flake
Start by preheating your oven to 400°F and lining two baking sheets with parchment paper. Puff pastry can be delicate, so I like to work with one sheet at a time to keep it cool and easier to handle.
Place a lightly floured surface underneath to prevent sticking. Gently roll out each puff pastry sheet, just enough to smooth any creases, then cut it into six even rectangles — twelve in total. Arrange them on your prepared baking sheets, leaving about an inch between each piece to allow space for puffing.
Before filling, take a fork and poke a few holes in the center of each rectangle. This helps the center stay flat while the edges rise beautifully. Leave about a half-inch border around each one — that’s your frame for the filling.
Making the Cream Cheese Filling – Smooth, Sweet, and Fluffy
In a medium bowl, beat the softened cream cheese, sugar, and almond extract together until smooth and creamy. I usually use a hand mixer for this, but a whisk works just as well if your cream cheese is very soft. The goal is a silky, spreadable consistency that won’t clump or tear the pastry.
This mixture adds that luscious, tangy sweetness you expect in a Danish. Almond extract is optional, but I highly recommend it — it gives a delicate depth that really complements the cherries.
Assembling the Danishes – Layering Flavor and Texture
Once the pastry and filling are ready, it’s time for the fun part. Spread about one heaping tablespoon of the cream cheese mixture in the center of each rectangle. I like to use the back of a spoon to gently smooth it out, leaving that small border around the edges clear.
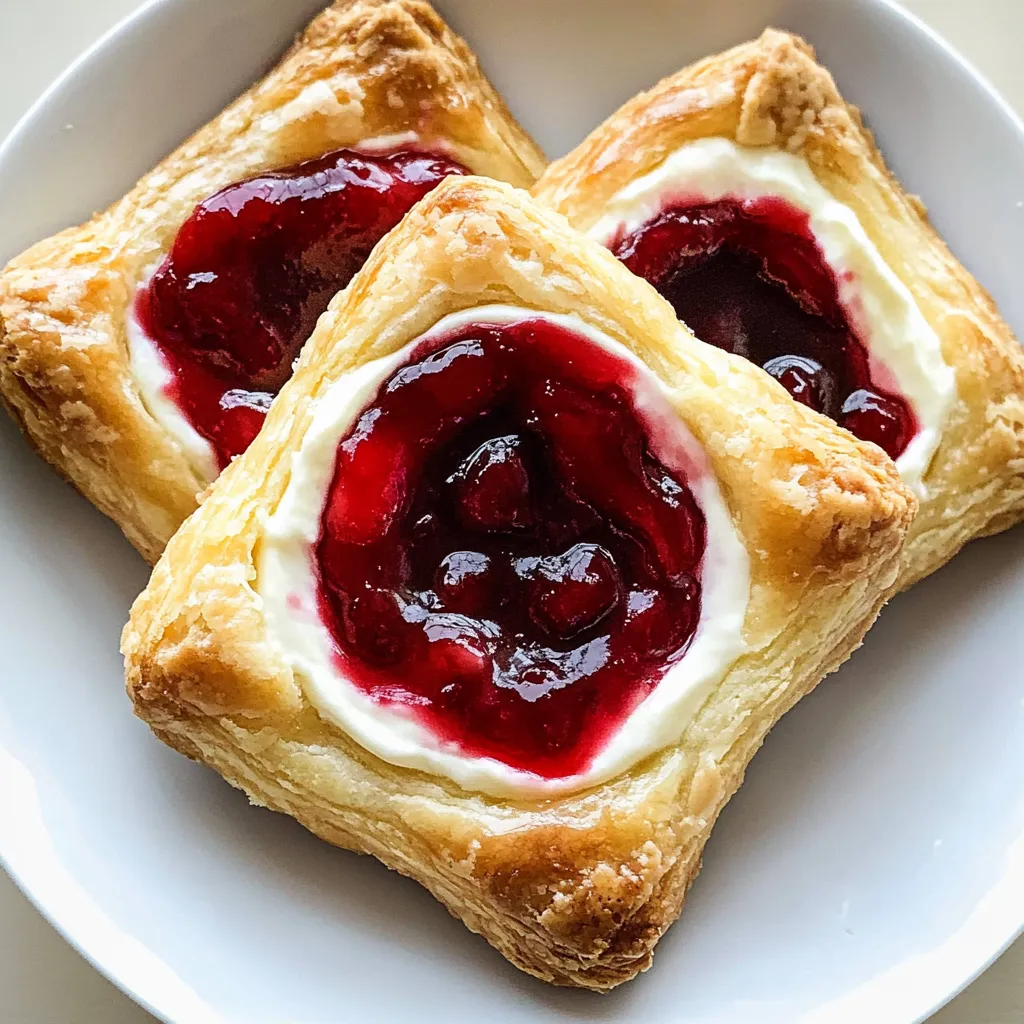
Next, spoon two generous tablespoons of cherry pie filling right on top of the cream cheese layer. Try to get a good mix of cherries and syrup, but don’t overload — too much filling can spill out while baking.
The contrast between the pale cream cheese and the glossy red cherries is already mouthwatering, even before they hit the oven.
The Secret to Golden, Flaky Perfection – The Egg Wash
Whisk together the egg and water in a small bowl until smooth, then brush the mixture along the outer edges of each pastry. This step is what gives the Danishes their rich, golden color and that irresistible, slightly crisp edge.
Make sure not to let the egg wash drip into the filling area — it can interfere with the rise of the pastry. A light touch here makes all the difference.
Baking and That Magical Moment When They’re Done
Slide the baking sheets into your preheated oven and bake for 15–18 minutes, or until the pastries are puffed and golden brown. You’ll know they’re done when the edges are beautifully flaky and the centers are bubbling slightly from the cherry filling.
The smell that fills your kitchen during this step is incredible — buttery pastry mingling with sweet fruit and warm almond. It’s the kind of aroma that makes everyone drift toward the oven, waiting for that first bite.
Once baked, remove the trays from the oven and let the Danishes cool slightly. As tempting as it is to grab one immediately, giving them a few minutes helps the filling set just enough for perfect texture.
Finishing Touches – A Dusting of Sweetness
Before serving, dust the pastries lightly with confectioners’ sugar. It adds a soft sweetness that balances the tart cherry filling and gives them that classic bakery look.
If you want to go a step further, you can drizzle a quick icing made of powdered sugar and milk instead — but honestly, the simplicity of just a sugar dusting is perfect here.
Serving Ideas – For Breakfast, Brunch, or Dessert
These Danishes are best enjoyed warm, ideally within a few hours of baking, when the pastry is at its crispiest. I love serving them alongside a cup of coffee or tea in the morning — the combination feels like a treat without being too heavy.
For a brunch table, pair them with fresh fruit, scrambled eggs, or yogurt for a balanced spread. They also make a beautiful dessert — just serve with a dollop of whipped cream or a scoop of vanilla ice cream if you want something extra indulgent.
Make-Ahead Tips and Storage
If you’d like to prepare them ahead, you can assemble the Danishes up to the egg wash step, then refrigerate for a few hours before baking. Bake them fresh when you’re ready to serve — that’s how you keep the pastry light and crisp.
Once baked, they’ll stay fresh at room temperature for about a day, or you can store them in the refrigerator for up to three days. To reheat, just pop them in a 350°F oven for about five minutes to revive the flakiness.
Flavor Variations – Change It Up Your Way
The beauty of this recipe is how easy it is to adapt. You can swap the cherry pie filling for blueberry, raspberry, or even apple if you prefer. For a more decadent version, sprinkle a few chocolate chips on top of the cream cheese layer before adding fruit.
If you like a little crunch, try topping them with slivered almonds before baking. And if you’re not a fan of almond extract, use vanilla instead for a softer, more classic flavor.
Your Cherry Cream Cheese Danish Questions Answered
Can I use homemade cherry filling instead of canned?
Absolutely. A quick homemade cherry compote with fresh or frozen cherries works beautifully — just make sure it’s thick enough not to run off the pastry.
Can I use puff pastry straight from the freezer?
No, it’s best to thaw it according to the package directions. Working with cold (but not frozen) pastry ensures it rises properly.
Why did my pastry turn soggy underneath?
Make sure your oven is fully preheated, and avoid overfilling the centers — excess moisture can prevent crisping. Baking on parchment paper helps too.
Can I make mini versions for a party?
Yes! Cut smaller squares and reduce baking time to around 12–14 minutes. They’re perfect as bite-sized treats for brunch or dessert platters.
What’s the best way to store leftovers?
Keep them in an airtight container in the fridge. When reheating, skip the microwave — a few minutes in the oven keeps that flaky texture intact.
Golden, crisp, and bursting with sweet cherry flavor — these Cherry Cream Cheese Danishes are the kind of homemade pastry that feels like a little luxury. They look fancy, taste incredible, and remind you that sometimes, the simplest recipes bring the most joy.
