
Why Homemade Breakfast Danish Pastries Are Worth Every Minute
There’s something magical about waking up to the smell of freshly baked pastries — that buttery aroma filling the kitchen, the golden layers puffing up in the oven, and the glossy fruit centers just begging to be devoured. These Homemade Breakfast Danish Pastries are the kind of treat that makes any morning feel special, yet they’re surprisingly easy to make.
I love this recipe because it captures the charm of bakery-style danishes without the fuss of making pastry from scratch. Using good-quality puff pastry gives you that perfect flake and rise, while the cream cheese filling and fruity jam bring a balance of tangy and sweet that’s irresistible. Whether it’s a slow Sunday breakfast, a brunch with friends, or a cozy holiday morning, these pastries always steal the show.
Ingredients You’ll Need for Perfect Danish Layers
The best pastries start with a few simple, high-quality ingredients. The combination of buttery puff pastry, creamy filling, and sweet glaze is what gives these danishes their signature flavor and texture.
Ingredients:
- 2 sheets puff pastry (thawed)
- 8 ounces cream cheese (softened)
- ¼ cup granulated sugar
- 1 teaspoon lemon juice
- 1 teaspoon vanilla extract
- 1 egg yolk
- ½ cup fruit jam or preserves (raspberry, apricot, or blueberry)
- 1 egg (beaten, for egg wash)
- 1 tablespoon coarse sugar (optional, for sprinkling)
- 1 cup powdered sugar
- 2–3 tablespoons milk
- ½ teaspoon vanilla extract (for glaze)
Each ingredient plays its part — the cream cheese brings richness, the lemon juice adds a subtle brightness, and the jam gives that fruity burst that makes every bite sing.
Making the Cream Cheese Filling – The Heart of the Danish
Start by preparing the creamy filling that gives these pastries their luscious center. In a medium bowl, mix together the softened cream cheese, granulated sugar, lemon juice, vanilla extract, and egg yolk until smooth and velvety.
This step is simple but important — make sure the cream cheese is fully softened before mixing so you don’t end up with lumps. The result should be a silky mixture that’s sweet with a light citrus tang. I often sneak a tiny spoonful at this stage; it’s that good.
Preparing and Shaping the Puff Pastry
Roll out your puff pastry sheets on a lightly floured surface to smooth out any creases. Cut them into even squares — about 4 inches each works nicely. Then, using a sharp knife, lightly score a border around the inside of each square (don’t cut all the way through).
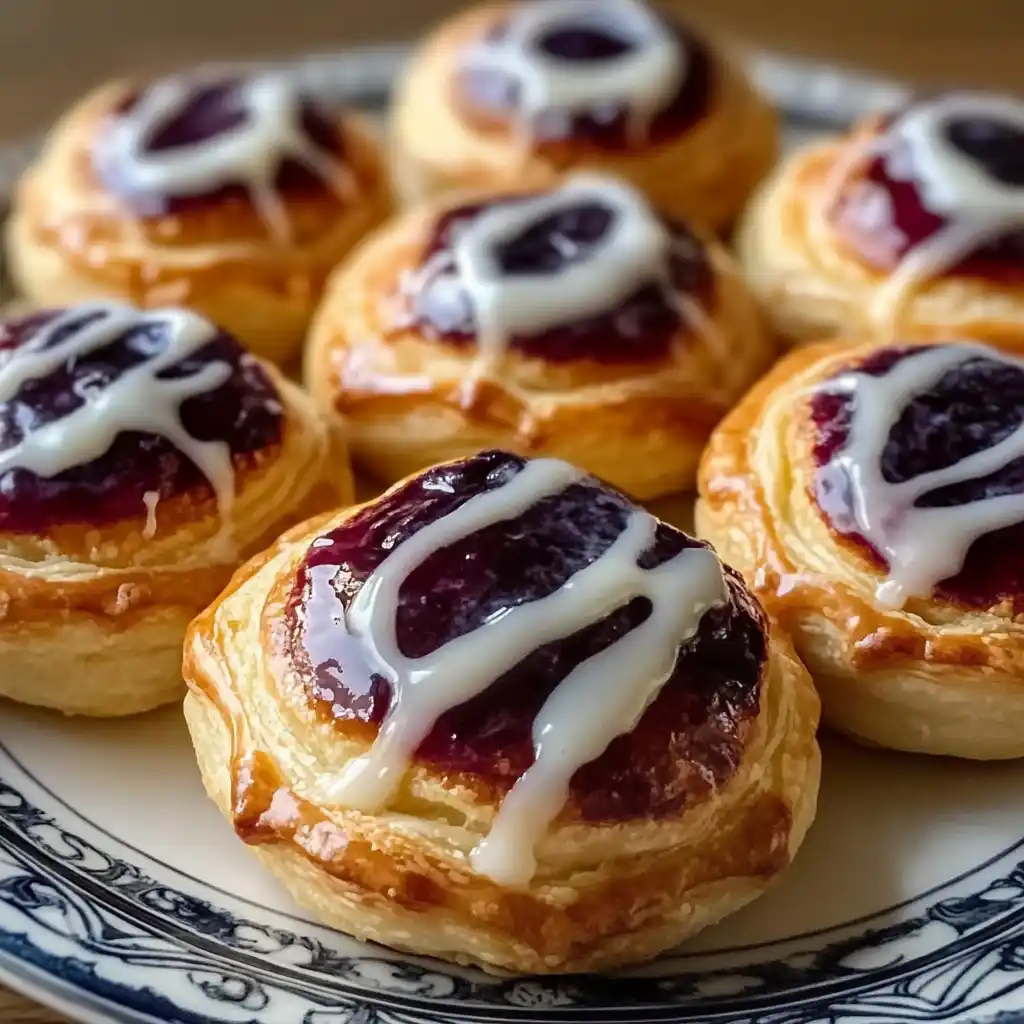
That small border helps the edges puff up beautifully around the filling. Spoon a small dollop of the cream cheese mixture into the center of each square, then top it with a teaspoon of your chosen jam. I love using raspberry for its vibrant color and tart sweetness, but apricot or blueberry work just as well.
As you fill them, you’ll start to see those bakery-style pastries taking shape.
Adding the Egg Wash and Sugar for Golden Perfection
Before baking, brush the pastry edges with the beaten egg — this gives that gorgeous golden finish you see in bakery windows. For a little extra sparkle and crunch, sprinkle the edges with coarse sugar. It catches the light beautifully once baked and adds a subtle caramelized bite.
Even this part feels rewarding — watching those pale pastry squares glisten as you prepare them for the oven.
Baking to Flaky, Buttery Perfection
Preheat your oven to 200°C (400°F) and line a baking sheet with parchment paper. Arrange the pastries with a bit of space between them to allow for puffing.
Bake for about 15–20 minutes, or until the pastries are puffed, golden, and slightly caramelized around the edges. The jam will bubble a little, and your kitchen will fill with the scent of butter and vanilla — a sure sign they’re nearly done.
When they come out of the oven, the pastry should be crisp and airy, with a creamy center that’s set but still soft. Let them cool slightly before glazing — this keeps the icing from melting away.
Making the Vanilla Glaze for That Bakery Finish
In a small bowl, whisk together the powdered sugar, milk, and vanilla extract until smooth. You can adjust the consistency by adding more milk for a thinner drizzle or more sugar for a thicker glaze.
Once the pastries have cooled, drizzle the glaze generously over each one. I like to use a spoon and move in a quick back-and-forth motion for that classic Danish look. The glaze adds just the right sweetness and shine, making each pastry look as good as it tastes.
Serving Ideas – When and How to Enjoy Your Danish Pastries
These pastries are best enjoyed fresh from the oven, slightly warm with a crisp edge and creamy center. Serve them alongside a cup of coffee or tea for the ultimate breakfast indulgence.
For brunch gatherings, arrange them on a platter with mixed fruit and maybe a dusting of powdered sugar — they’ll disappear fast. You can also reheat leftovers in the oven for a few minutes to bring back that just-baked texture.
I love keeping a few in the freezer for last-minute guests; just pop them in the oven and drizzle the glaze fresh before serving.
Flavor Variations and Creative Twists
Once you’ve mastered the basic recipe, you can have fun experimenting with flavors. Try swapping the jam for Nutella or lemon curd, or add a few fresh berries on top before baking.
If you’re feeling adventurous, sprinkle a few chopped almonds or pistachios over the glaze for texture. You can even add a touch of almond extract to the filling for a more European-style pastry.
These small tweaks make the recipe endlessly adaptable — and each version feels like a new favorite.
Tips for Flaky Pastry and Creamy Filling Every Time
- Keep the pastry cold: The colder the pastry, the flakier the layers. Don’t leave it out too long before baking.
- Don’t overload the filling: Too much cream or jam can cause the pastry to collapse or leak.
- Rotate your tray halfway through baking: This helps everything brown evenly.
- Cool before glazing: It keeps the icing bright and crisp instead of soaking in.
I’ve made these countless times, and these little tips really make the difference between “good” and “wow.”
Your Danish Pastry Questions, Expertly Answered
Can I make these ahead of time?
Yes! Assemble the pastries (without the glaze) and refrigerate overnight. Bake fresh in the morning and glaze once cooled.
What’s the best jam to use?
Raspberry and apricot are my top picks — both hold up well in the oven and balance beautifully with the cream cheese filling.
Can I freeze them?
Absolutely. Bake, cool completely, and freeze in an airtight container. Reheat in the oven before serving and add the glaze after warming.
Why did my pastry not puff up properly?
This usually happens if the pastry was too warm before baking or the oven wasn’t hot enough. Make sure your oven is fully preheated and the pastry stays chilled until it goes in.
How long do they stay fresh?
They’re best the same day but will keep for up to two days in an airtight container at room temperature. You can reheat them lightly before serving.
Flaky, buttery, and filled with creamy sweetness, these Homemade Breakfast Danish Pastries are pure comfort on a plate. Each bite is a little taste of bakery heaven — and once you make them yourself, you’ll wonder why you ever bought them pre-made.
