
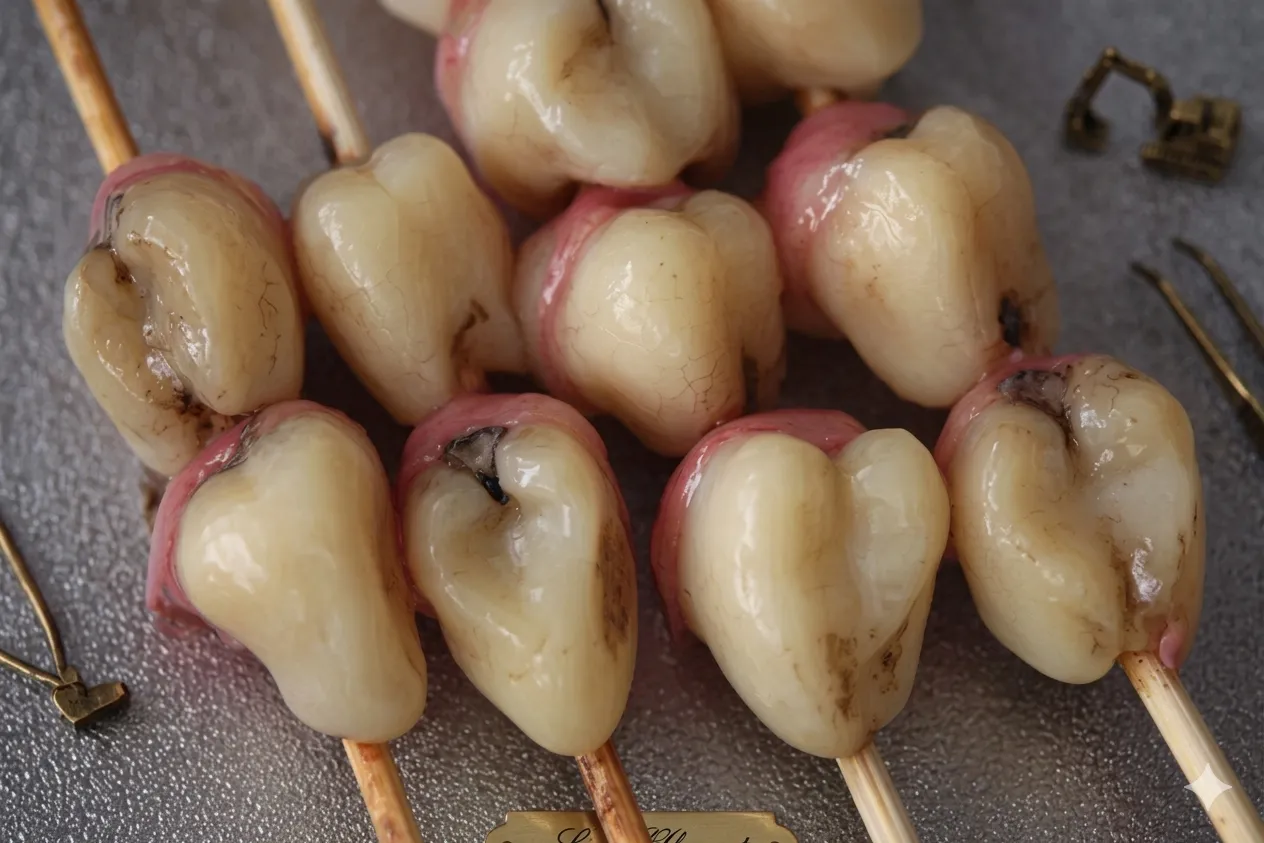
There’s something hilariously fun about these Rotten Teeth Chocolate Strawberries. They look a little creepy at first glance, but that’s exactly the charm. I first made them around Halloween, and honestly, they became the most talked-about dessert on the table. People hesitate for a second… then they take one bite and suddenly they’re gone.
What I love most is the contrast: juicy fresh strawberries wrapped in smooth chocolate, then decorated in a way that feels artistic, almost theatrical. It’s messy in the best possible way, and you don’t need to be a professional decorator to pull it off.
Ingredients
- 1 pound strawberries
- 4 oz white chocolate, chopped
- 4 oz dark chocolate, chopped
- 2 tbsp coconut oil
- Edible silver pearl dust
- 1 tsp yellow gel food color
- 1 tsp black gel food color
- 1 tbsp clear flavoring or vodka
- Black edible marker (optional)
- Cake decorating brushes
- 2 tbsp cocoa powder
- Skewers
How to Make Rotten Teeth Chocolate Strawberries
Start with the strawberries. Wash them carefully, but this part is important—dry them completely. I usually lay them on a towel and let them sit a bit longer than I think I need to. Any moisture left on the surface can mess with the chocolate coating later. Choose strawberries that are slightly elongated because they give you that “teeth-like” shape.
Next, melt the white and dark chocolate together with the coconut oil. I like doing this slowly over a double boiler so the chocolate stays glossy and smooth. You’ll notice the smell immediately—it’s rich and slightly nutty if you’re using good-quality chocolate.
Dip each strawberry into the melted chocolate, letting the excess drip off. Don’t rush this part. A thin, even coating works better than a thick one. Place them gently onto parchment paper and let them set slightly before decorating.
While the chocolate is still soft, sprinkle a bit of edible silver pearl dust over the surface. It gives them this eerie shimmer that catches the light in a really unexpected way.
Now for the “rotten” effect, which is where the fun begins. Mix your yellow and black gel food colors with a small amount of vodka or clear flavoring. This thins the colors so you can paint more naturally. I’ve tried water before, and it just doesn’t behave the same way—the finish becomes dull and uneven.
Using cake decorating brushes, lightly paint the strawberries. Think stains, uneven patches, and shadowy smudges rather than anything perfect. This is where you get creative. I sometimes let the brush slip a little on purpose because it makes them look more realistic and oddly artistic.
If you want extra detail, you can use a black edible marker to draw fine lines or imperfections. A light dusting of cocoa powder adds an aged, slightly dusty look that ties everything together.
Once you’re happy with the decoration, let the strawberries set in the refrigerator. Give them enough time so the chocolate fully hardens and the design locks in place. The transformation at this stage is always satisfying—they go from messy and glossy to polished and eerie.
Tips for the Best Results
Dry strawberries are everything here. Even a tiny bit of water can cause the chocolate to seize or slide off.
Don’t overthink the design. The “rotten” effect actually looks better when it’s uneven and imperfect. I’ve found that the more I try to make it perfect, the less convincing it looks.
Work quickly when decorating. The chocolate sets faster than you think, especially in cooler kitchens.
Serving and Presentation Ideas
These are perfect for themed parties, especially Halloween, horror movie nights, or fun dessert tables. I like serving them on a dark plate or wooden board so the contrast makes them stand out even more.
They also work surprisingly well as a conversation piece. People always ask how they’re made before they even think about eating them.
Storage
Keep them in the refrigerator in a single layer so they don’t stick together. They’re best eaten within a couple of days while the strawberries are still fresh and juicy inside.
Sweet Curiosities: Your Candied Orange Questions Answered
Even though these aren’t traditional candies, I always get questions whenever I make them. Here are a few that come up often:
Can I skip the decorative painting?
Yes, absolutely. They still taste amazing with just the chocolate coating.
Why use coconut oil in the chocolate?
It helps thin the chocolate slightly and gives it a smoother, more glossy finish.
Can I use milk chocolate instead of dark chocolate?
Yes, but the darker chocolate gives a stronger contrast for the design, which makes the “rotten” effect more dramatic.
Do I really need edible silver dust?
Not strictly, but it adds a subtle shimmer that makes them look more polished and intentional.
Can I prepare them ahead of time?
You can make them a day in advance, but I recommend eating them as fresh as possible for the best texture.
