
A Sweet Taste of Nostalgia – The Story Behind Layered Chocolate Cakes
There’s something almost mesmerizing about a multi-layer chocolate cake. Every thin slice tells a story of patience, precision, and pure chocolate devotion. This kind of cake always reminds me of special occasions—the kind where you clear the counter, take a deep breath, and really enjoy the process.
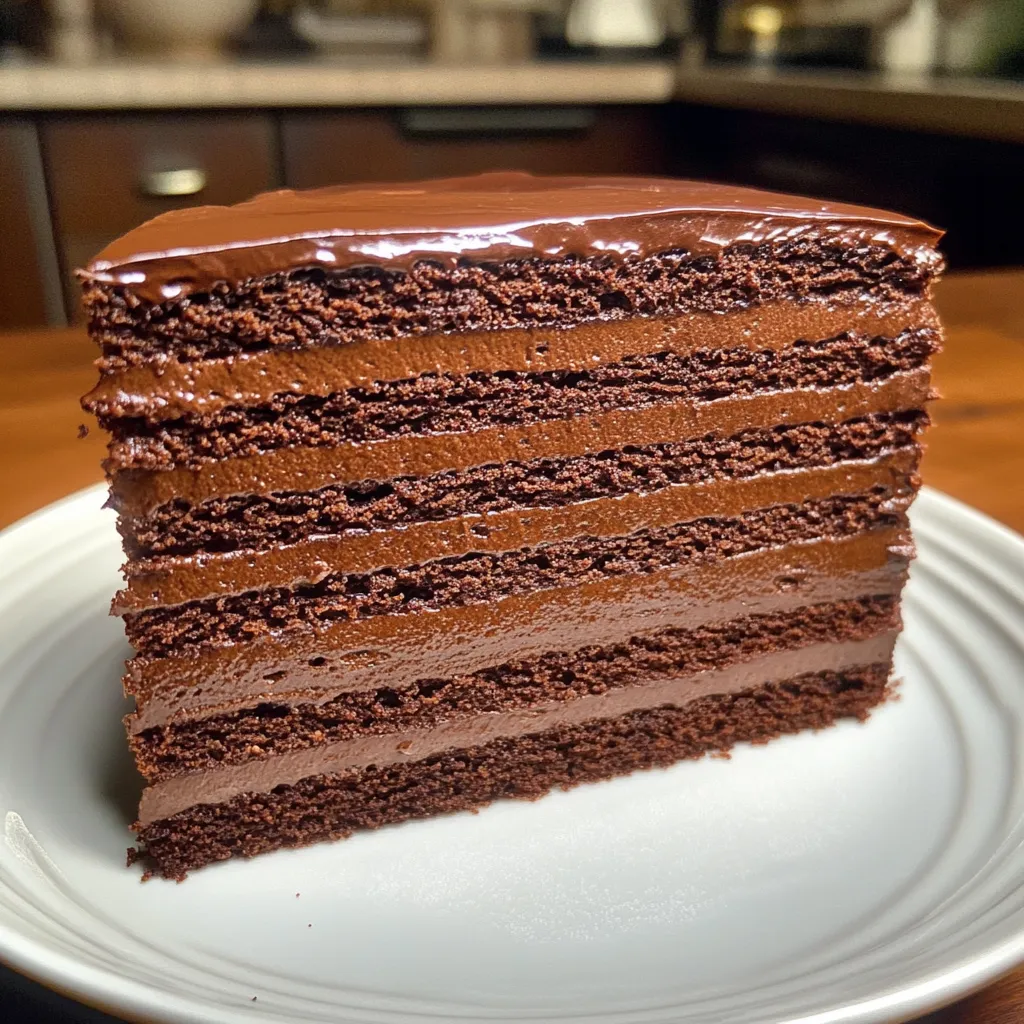
I love how layered chocolate cakes feel both classic and dramatic at the same time. When you cut into it and see all those delicate layers stacked perfectly, it’s incredibly satisfying. This version, with soft chocolate sponge, smooth chocolate crémeux, and a shiny mirror glaze, is rich without being heavy and elegant without feeling fussy. It’s the kind of dessert that makes people pause before the first bite.
What You’ll Need to Make This Layered Chocolate Masterpiece
This cake is built in three parts, and each one relies on good-quality ingredients. Chocolate really shines here, so use the best dark chocolate you can find—it makes a noticeable difference.
Ingredients
Chocolate Sponge:
- 6 eggs
- 150 g sugar
- 120 g flour
- 30 g cocoa powder
- 40 g melted butter
- 1 teaspoon vanilla
- Pinch of salt
Chocolate Crémeux:
- 500 ml heavy cream
- 200 g dark chocolate
- 4 egg yolks
- 60 g sugar
- 1 teaspoon vanilla
Chocolate Mirror Glaze:
- 150 g sugar
- 75 ml water
- 50 g cocoa powder
- 100 ml heavy cream
- 6 g gelatin, soaked
Preparing Your Ingredients for Clean, Even Layers
Before you start mixing anything, take a few minutes to get organized. This cake rewards preparation. Separate your eggs while they’re still cold—it’s easier—and then let them come to room temperature. Measure everything carefully, especially the flour and cocoa powder, to keep the sponge light.
I also like to line my baking tray and have my offset spatula ready before I start. When you’re working with thin layers and soft creams, timing and flow in the kitchen really matter.
Crafting the Sponge – The Foundation of Every Great Layer Cake
Start by whipping the eggs with sugar and vanilla until the mixture turns pale, thick, and fluffy. This step builds structure, so don’t rush it. When you lift the whisk, the batter should fall back in soft ribbons.
Sift the flour, cocoa powder, and salt together, then gently fold them into the egg mixture. Use slow, careful movements—you want to keep as much air as possible. Finally, fold in the melted butter, which adds tenderness and a subtle richness.
Spread the batter thinly and evenly, then bake at 170°C (340°F) for about 12 to 15 minutes. The sponge should spring back lightly when touched. Let it cool completely before slicing; warm sponge tears easily, and patience here pays off later.
Simmer, Whisk, and Smooth – Building a Luxurious Chocolate Crémeux
Heat the heavy cream until it’s steaming but not boiling. Meanwhile, whisk the egg yolks with sugar until slightly pale. Slowly pour the hot cream over the yolks while whisking constantly—this step always makes me slow down and focus.
Return the mixture to low heat and cook gently until it thickens just enough to coat the back of a spoon. Pour it over the chopped dark chocolate and vanilla, then stir until smooth and glossy. The smell at this stage is pure chocolate heaven.
Chill the crémeux until it’s spreadable. It should be silky and soft, not runny. If it firms up too much, let it sit at room temperature for a few minutes.
Tips for Clean Layers and Balanced Chocolate Flavor
- Slice the sponge with a long serrated knife for clean, even layers.
- Keep the crémeux thin between layers to avoid overpowering the sponge.
- Chill the cake briefly during assembly if it starts to feel unstable.
- Use high-quality cocoa and chocolate to avoid a flat or overly sweet flavor.
Little details like these are what turn a good cake into a memorable one.
Coating and Chilling – Achieving a Perfectly Smooth Mirror Glaze
Assemble the cake by alternating sponge and thin layers of crémeux, pressing gently as you go. Once assembled, chill the cake until it’s very firm. This step is essential for a flawless glaze.
For the mirror glaze, heat the water, sugar, cocoa powder, and cream until smooth and fully combined. Remove from heat and stir in the soaked gelatin until dissolved. Let the glaze cool to a lukewarm temperature—it should flow smoothly without melting the cake.
Pour the glaze over the chilled cake in one confident motion. I always hold my breath for a second here, watching it cascade down the sides. It’s one of those quiet, satisfying kitchen moments.
Serving and Storing Your Layer Chocolate Cake
Chill the cake again before slicing. This helps the layers set and gives you those clean, beautiful cuts. Use a warm knife for the neatest slices, wiping it between each cut.
Store leftovers in the refrigerator, well covered, for up to three days. The flavors actually deepen overnight, making the second slice just as good as the first.
Creative Ways to Present This Cake for Special Occasions
This cake doesn’t need much decoration, but you can elevate it easily. A dusting of cocoa powder, a few chocolate curls, or a simple gold leaf accent adds elegance.
For celebrations, I like to serve smaller slices—it’s rich, and a little goes a long way. Pair it with coffee or espresso, and it feels like a true dessert moment.
Variations to Try – From Dark Chocolate Intensity to Lighter Twists
You can adjust the chocolate intensity by changing the cocoa percentage in the crémeux. For a lighter version, use milk chocolate or add a thin layer of vanilla cream between chocolate layers.
If you enjoy texture, try adding a crisp chocolate feuilletine layer or a thin praline spread. It adds contrast without overwhelming the cake.
Nutrition Snapshot – A Rich Dessert Meant to Be Savored
This is a decadent dessert, no doubt. It’s rich in fats and sugars, but it’s also deeply satisfying. Because of its intensity, most people are happy with a small slice, making it a treat meant for mindful enjoyment rather than everyday indulgence.
Sweet Questions Answered – Your Chocolate Cake FAQ Corner
Can I make this cake ahead of time?
Yes, it’s actually better made a day ahead. The layers set beautifully, and the flavors meld overnight.
Why did my glaze look dull?
The glaze may have been too cool or poured unevenly. Make sure it’s lukewarm and poured in one smooth motion.
Can I freeze this cake?
You can freeze it before glazing. Thaw fully in the fridge, then glaze for the best finish.
How do I get ultra-thin sponge layers?
Bake the sponge in a very thin sheet and use a ruler and sharp knife to guide your cuts.
Is this cake very sweet?
It’s rich but balanced, especially if you use dark chocolate with a higher cocoa percentage.
This Layer Chocolate Cake is the kind of dessert that rewards patience and care. Take your time, enjoy each step, and trust the process. When you finally slice into it and see those layers shine, you’ll know it was worth every moment.
