
A Love Story Between Cake and Mousse
Chocolate mousse cake is one of those desserts that feels both fancy and familiar at the same time. It’s elegant enough for celebrations, yet comforting enough to make on a quiet weekend when you’re craving something truly chocolatey. I’ve made this cake for birthdays, dinner parties, and even ordinary Sundays, and it never fails to impress. Every time I slice into it, I still admire how the smooth mousse layer sits perfectly on top of the soft chocolate sponge.
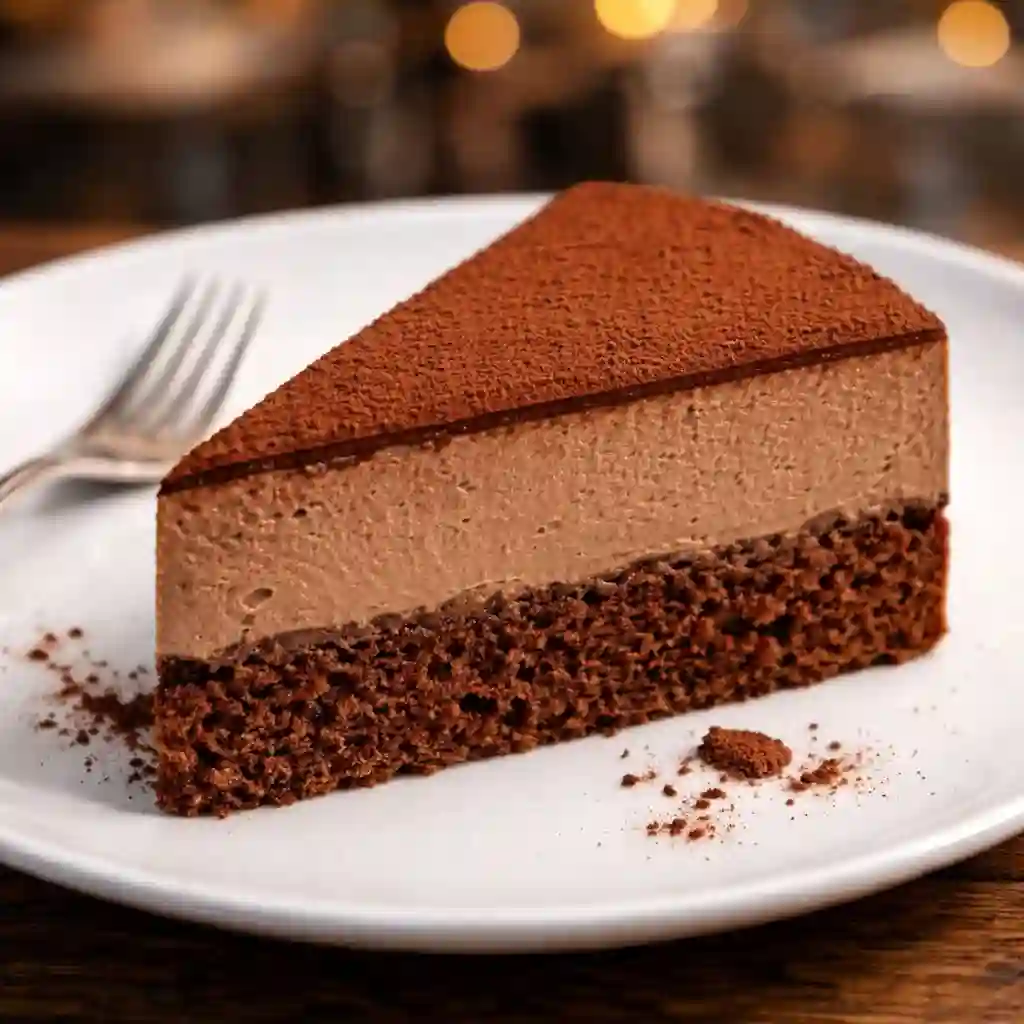
What makes this cake special is the contrast. The base is light and tender, with just enough structure to support the mousse. The mousse itself is airy, silky, and rich without being heavy. When you chill the cake, the flavors deepen and the texture becomes almost truffle-like. You’ll notice the aroma the moment you open the fridge—deep cocoa mixed with vanilla and cream. It’s the kind of dessert that makes people pause after the first bite and say, “Wow.”
This recipe doesn’t rely on complicated techniques or special tools. It’s about patience, gentle folding, and letting time in the refrigerator do the final work. I love how calm and meditative the process feels, especially when whipping cream and watching chocolate melt into something glossy and smooth.
What You’ll Need for This Chocolate Dream Dessert
This recipe uses classic baking ingredients, but quality matters. Choose a good semi-sweet chocolate bar instead of chocolate chips if you can. It melts more evenly and tastes richer. Fresh eggs and real vanilla also make a noticeable difference.
Ingredients:
Chocolate Sponge Base:
- 3 eggs
- ½ cup sugar
- ½ cup all-purpose flour
- 2 tablespoons cocoa powder
- 2 tablespoons melted butter
Mousse Layer:
- 10 oz semi-sweet chocolate, finely chopped
- 2 cups heavy cream, divided
- 1 teaspoon vanilla extract
- Pinch of salt
Topping:
- Extra cocoa powder for dusting
Each ingredient has a role. The eggs and sugar create structure in the sponge. The cocoa adds depth. The cream and chocolate combine to form that luxurious mousse layer. Even the pinch of salt is important—it balances the sweetness and enhances the chocolate flavor.
Preparing the Chocolate Sponge Base
Begin by preheating your oven to 350°F (175°C). Grease an 8-inch springform pan and line the bottom with parchment paper. This small step saves a lot of stress later when it’s time to release the cake.
In a large mixing bowl, whisk the eggs and sugar together until the mixture becomes pale, thick, and slightly fluffy. This takes about 3 to 4 minutes by hand or 2 minutes with an electric mixer. You’ll know it’s ready when the batter falls in ribbons from the whisk and sits on the surface for a few seconds before disappearing. This step traps air in the batter and helps the sponge rise without baking powder.
Sift the flour and cocoa powder together to remove lumps, then gently fold them into the egg mixture using a spatula. Work slowly and lightly. I always turn the bowl with one hand and fold from the bottom up to avoid deflating the batter.
Drizzle in the melted butter and fold again just until combined. The batter should be smooth, thick, and airy. Pour it into the prepared pan and smooth the top. Bake for 15 to 20 minutes, until the surface springs back when touched lightly and a toothpick comes out clean.
Let the cake cool completely in the pan. This is essential. A warm base will melt the mousse and ruin the clean layers you worked so hard to create.
Melting the Chocolate for the Mousse
Place the chopped chocolate in a heatproof bowl. Heat ½ cup of the heavy cream in a small saucepan over medium heat until it just begins to simmer around the edges. Do not boil it. Boiling cream can scorch and cause the chocolate to seize.
Pour the hot cream over the chocolate and let it sit undisturbed for about 5 minutes. This allows the chocolate to soften slowly. Then stir gently from the center outward until the mixture becomes smooth, shiny, and thick like ganache.
Set the chocolate mixture aside and allow it to cool to room temperature. It should feel slightly warm or neutral to the touch, never hot. This step is crucial. Warm chocolate will melt the whipped cream and turn the mousse runny instead of fluffy.
Whipping the Cream to the Perfect Texture
In a separate bowl, pour the remaining 1½ cups of heavy cream. Add the vanilla extract and a pinch of salt. Beat with a mixer until medium peaks form.
Medium peaks mean the cream holds its shape but still looks soft and creamy. If you lift the whisk, the tip of the cream should gently fall over instead of standing straight up. Over-whipped cream becomes grainy and difficult to fold, so stop as soon as you reach this stage.
I always slow down near the end and finish whipping by hand with a whisk. It gives me better control and prevents over-whipping.
Folding the Mousse Like a Pro
Add one-third of the whipped cream to the cooled chocolate mixture and stir gently to lighten it. This makes it easier to fold in the rest without losing volume.
Then add the remaining whipped cream in two batches, folding slowly with a spatula. Scoop from the bottom of the bowl and lift upward, turning the bowl as you go. Take your time. Rushing this step can deflate the mousse.
As you fold, you’ll see the color change from dark chocolate to a lighter, airy brown. The texture should be smooth, fluffy, and uniform with no white streaks remaining. This is the heart of the cake—the mousse should feel like soft clouds of chocolate.
Building and Chilling the Cake
Pour the mousse over the cooled sponge base while it’s still in the springform pan. Spread it evenly with a spatula and smooth the top. Tap the pan gently on the counter to release any trapped air bubbles.
Cover loosely with plastic wrap and place the cake in the refrigerator for at least 4 hours. Overnight is even better. During this time, the mousse sets and the flavors develop fully.
When ready, the cake should feel firm to the touch but still soft underneath. The top should look matte and smooth.
Serving and Storing Your Chocolate Mousse Cake
Before serving, run a thin knife around the edge of the pan and carefully release the springform ring. Dust the top generously with cocoa powder using a fine sieve. This adds bitterness to balance the sweetness and gives the cake a professional look.
Slice with a sharp knife, wiping it clean between cuts for neat, beautiful slices. Serve chilled.
Store leftover cake in the refrigerator, tightly covered, for up to three days. The texture remains creamy and the flavor becomes even richer after resting.
Creative Ways to Dress It Up
This cake is stunning on its own, but you can decorate it in many ways. Chocolate shavings, fresh raspberries, strawberries, or blueberries pair beautifully with the mousse.
For a more dramatic presentation, drizzle melted chocolate or ganache over the top. You can also pipe whipped cream around the edges or add a light dusting of powdered sugar along with cocoa powder.
If serving for holidays, I like adding gold sprinkles or chocolate curls for a festive look.
Variations to Try for Different Occasions
You can customize this cake easily. Use dark chocolate for a more intense flavor or milk chocolate for a sweeter version.
For a mocha twist, dissolve one teaspoon of instant espresso powder into the hot cream before pouring it over the chocolate.
For a citrus version, add orange zest to the mousse. For a fruity layer, spread raspberry jam over the cake base before adding the mousse.
You can even make this as individual mousse cakes using small dessert rings or glasses for portioned servings.
Nutrition Snapshot – A Treat Worth Savoring
Chocolate mousse cake is a rich dessert meant to be enjoyed in moderation. It contains protein from eggs and cream and antioxidants from cocoa. A small slice is satisfying because of its intense flavor and creamy texture.
It’s not an everyday dessert, but it’s perfect for special moments when you want something truly indulgent.
Sweet Questions Answered – Your Chocolate Mousse Cake FAQ Corner
Can I make this cake ahead of time?
Yes. This cake is ideal for making one day in advance. It sets better and slices more cleanly after overnight chilling.
Why did my mousse turn runny?
Most likely the chocolate was still warm or the cream was under-whipped. Make sure both are at the correct temperature and texture before folding.
Can I freeze chocolate mousse cake?
Yes. Wrap it tightly and freeze for up to one month. Thaw slowly in the refrigerator before serving.
Do I need gelatin to set the mousse?
No gelatin is needed. The whipped cream and chocolate naturally firm up when chilled.
What is the best chocolate to use?
High-quality semi-sweet chocolate bars work best. Avoid chocolate chips if possible, as they contain stabilizers that affect texture.
Chocolate mousse cake is one of those desserts that feels luxurious yet achievable. From whisking eggs to folding chocolate and cream, every step feels rewarding. When you finally slice into that smooth, glossy cake and take the first bite, you’ll know it was worth every minute of waiting.
